Labels and TextBoxes
This page describes the way to add Labels and TextBoxes on the Window.
TextBoxes are used to handle inputs and sometimes they are used to display text outputs. Labels on the other hand are used to describe these textboxes to the user. i.e. if the Gui has a TextBox that is used to enter a password, it is more likely that the Textbox will have a label next to it that describes that the textbox is responsible for passwords.
TextBox has the following properties:-
Name = S, Text = S, TextAlign = CA, Width = M, Height = M, ForeColor = C, BackColor = C, Font = FNT, halign = HA, valign = VA and ReadOnly = B. The only property that is worth discussing here is the ReadOnly property, which is a boolean property. If ReadOnly is set to True it means that the TextBox can only be used for output purposes.
The full description of other properties can be found here.
Labels in views have all the properties supported by the Buttons. To see Buttons properties click here.
Examples
The next Example shows how Labels and TextBoxes can be added on the views window and how different properties to Labels and TextBox can be utilised.
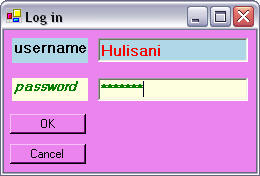
Example 2.4.1: Source
As usual the code responsible for the image above is given below.
| @"<Form Text= 'Log in' BackColor =
Violet> <Vertical> <Horizontal> <Label Text = username BackColor = LightBlue Font = Bold11/> <TextBox Name = 'username' Text = 'Hulisani' BackColor = LightBlue ForeColor = Red Font = Bold11/> </Horizontal> <Horizontal> <Label Text = password BackColor = LightYellow Font = BoldItalic ForeColor = Green/> <TextBox Name = 'password' Text = '*******' BackColor = LightYellow ForeColor = Green Font = Bold/> </Horizontal> <Button Name = Ok/> <Button Name = Cancel/> </Vertical> </Form>"; |
The next example shows a TextBox which is 300 points long
Example 2.4.2: Source
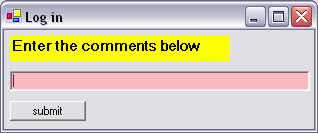
Below is the code for example 2.4.2.
| @"<Form Text= 'Log in'> <Vertical> <Label Text = 'Enter the comments below' BackColor = Yellow Font = Bold11/> <TextBox Name = 'txtbox1' BackColor = Pink ForeColor = Blue width = 300/> <Button Name = Submit/> </Vertical> </Form>"; |